Showing posts with label Nissan. Show all posts
Showing posts with label Nissan. Show all posts
Friday, October 26, 2012
Nissan R32 Repair manual
Manufacturer: Nissan
Model: R32
Year: 1989 - 1994
Quick Reference Index:

Download/Readhere
Model: R32
Year: 1989 - 1994
Quick Reference Index:
- General Information
- Engine
- Chassis
- Body
- Heater and Air Conditioner
- Electrical System
- Service Data
Engine Repair Index:
- How to use this manual
- General Precautions
- Vehicle and Unit Identification Plate Location
- Consult
- Tightening Torque of Standard Bolts
- Towing
- 4WD Inspection and Repair Precautions
DOWNLOAD Part 1 (main manual
DOWNLOAD Part 2 (engine manual)
File Size: 45 MB
File Type: PDF

Nissan 300ZX Z32 1996 Repair Manual
Manufacturer: Nissan
Model: 300ZX Z32 Series
Year: 1996
** Includes Circuit and Wiring Diagrams
 Quick Reference Index:
Model: 300ZX Z32 Series
Year: 1996
** Includes Circuit and Wiring Diagrams

- General Information
- Maintenance
- Engine Mechanical
- Engine Lubrication and Cooling System
- Engine Fuel System
- Emission Control System
- Engine Control, Fuel and Exhaust Systems
- Clutch
- Manual Transmission
- Automatic Transmission
- Propeller Shaft and Differential Carrier
- Front Axle and Front Suspension
- Rear Axle and Rear Suspension
- Brakes
- Steering System
- Body
- Heater and Air Conditioner
- Electrical System
File Size: 36 MB
File Type: RAR, DOC
Nissan S13 CA18DET Service Manual
Manufacturer: Nissan
Model: Silvia S13
Year: 1989-1994
 Quick Reference Index:
Download/Readhere
Model: Silvia S13
Year: 1989-1994

- General Information
- Maintenance
- Engine Mechanical
- Engine Lubrication and Cooling Systems
- Engine Fuel and Emission Control Systems
- Engine Control, Fuel and Exhaust Systems
- Clutch
- Manual Transmission
- Automatic Transmission
- Propeller Shaft and Differential Carrier
- Front Axle and Front Suspension
- Rear Axle and Rear Suspension
- Brake System
- Steering System
- Body
- Heater and Air Conditioner
- Electrical System
File Size: 26 MB
File Type: PDF
Wednesday, August 22, 2012
Nissan Altima L32 U32 2008 Repair Manual
Manufacturer: Nissan
Model: Altima L32 U32
Year: 2008
Contains the following information and repairs for:

Model: Altima L32 U32
Year: 2008
Contains the following information and repairs for:
- Quick Reference Index
- Foreword
- General Information
- Engine
- Hybrid
- Transmission and Driveline
- Suspension
- Brakes
- Steering
- Restraints
- Ventilation Heater and Air Conditioner
- Body Interior
- Body Exterior, Doors, Roof and Vehicle Security
- Driver Controls
- Electrical & Power Control
- Driver Information and Multimedia
- Cruise Control
- Maintenance
- Power Supply Routing Circuit
- Fuse Block Junction Box (J/B)
- Fuse, Fusible Link and Relay Box
- IPDM E/R (Intelligent Power Distribution Module Engine)
- Comment Sheet
- Quick Reference Chart
File Size: 67 MB
File Type: PDF, RAR
Tuesday, August 21, 2012
Nissan Sentra B16 2008 Repair Manual
Manufacturer: Nissan
Model: Sentra B16, N16
Year: 2008
Contains the following information and repairs for:

Model: Sentra B16, N16
Year: 2008
Contains the following information and repairs for:

- General Information
- Engine Mechanical
- Engine Lubrication System
- Engine Cooling System
- Engine Control System
- Fuel System
- Exhaust System
- Accelerator Control System
- Clutch
- Manual Transaxle
- CVT
- Front and Rear Axle
- Front and Rear Suspension
- Road Wheels and Tires
- Brake System
- Parking Brake System
- Brake Control Sytem
- Power Steering System
- Steering Control System
- Seat Belts
- Supplemental Restraint System (SRS)
- Body, Lock and Security System
- Glasses, Window System and Mirrors
- Roof
- Exterior and Interior
- Instrument Panel
- Seat
- Manual Air Conditioner
- Starting and Charging System
- Lighting System
- Driver Information System
- Wiper, Washer and Horn
- Body Control System
- LAN System
- Audio Visual, Navigation and Telephone System
- Auto Cruise Control System
- Power Supply, Ground and Circuit Elements
- Maintenance
File Size: 62 MB
File Type: PDF, RAR
Wednesday, July 4, 2012
Nissan Rouge 2007-09 Repair Manual
Contains the following information and repairs for:


- Accelerator Control System
- Audio, Visual and Navigation System
- Body Control System
- Brake System
- Body Repair
- Charging & Starting System
- Engine Cooling System
- Defogger
- Door and Lock
- Drive Line
- Engine Control System
- Engine Mechanical
- Exhaust System
- Exterior Lighting System
- Exterior and Interior
- Front and RearAxle
- Fuel System
- Glass and Window System
- Heater and Airconditioning System
- Interior Lighting System
- Instrument Panel
- LAN System
- Engine Lubrication System
- Maintenance
- Meter, Warning Lamp & Indicator
- Parking Brake System
- Power Control System
- Power Supply, Ground and Circuit Elements
- Power Window Control System
- Transaxle and Transmission
- Power Outlet
- Front and Rear Suspension
- Seatbelts, Seat, Horn, Wiper and Washer Mirror, Roof, SRS Airbag, Warning Chime and Ventilation System
- Security Control System
- Steering System
- Road, Wheels and Tires
File Size:
File Type: PDF, RAR
Monday, July 2, 2012
Nissan Versa 2008 Repair Manual
Model: Versa
Year: 2008
Manufacturer: Nissan
Contains the following information and repairs for:

Year: 2008
Manufacturer: Nissan
Contains the following information and repairs for:

- General Information
- Engine Mechanical
- Engine Lubrication System
- Engine Cooling System
- Engine Control System
- Fuel System
- Exhaust System
- Accelerator Control System
- Clutch System
- Manual and Automatic Transaxle
- CVT
- Front Axle
- Rear Axle
- Front and Rear Suspension
- Road, Wheels and Tires
- Brake System
- Parking Brake System
- Brake Control Sytem
- Power Steering System
- Steering Control System
- Seat Belts
- Supplemental Restraint System (SRS)
- Body, Lock and Security System
- Glasses, Window System and Mirrors
- Roof
- Exterior and Interior
- Instrument Panel
- Seat
- Manual Airconditioner
- Starting and Charging System
- Lighting System
- Driver Information System
- Wiper, Washer and Horn
- Body Control System
- LAN System
- Audio, Visual, Navigation and Telephone System
- Auto Cruise Control System
- Power Supply, Ground and Circuit Elements
- Maintenance
File Size: 57 MB
File Type: PDF
Monday, April 2, 2012
Datsun/Nissan 1975 Drive Axles Separate Carrier Repair Manual
DATSUN SEPARATE CARRIER
Models Covered- B210 Series
- 610 Station Wagon
- 620 Series
- 710 Series
DESCRIPTION
Differential gear carrier assembly has a hypoid type pinion and ring gear set. The gear carrier is constructed of cast iron. The drive pinion is mounted in two tapered roller bearings that are preloaded by a collapsible spacer or non-adjustable spacer. Drive pinion is aligned into position with a shim located between shoulder on drive pinion and rear bearing. Differential case is supported in carrier by two tappered roller side bearings. The side bearings are preloaded by inserting shims between bearings and differential. Case houses two side gears that mesh with two pinion gears mounted on pinion shaft. The pinion shaft is held in case with a lock pin. Pinions and side gears are set in front of thrust washers.
AXLE RATIO AND IDENTIFICATION
Datsun does not identify rear axle with a particular outside identification marking, however all models use same basic type of removable carrier rear axle. It should be noted that part or model numbers may vary between vehicle models, but the internal design is similar. The following table indicates the axle ratios that are available, any not found in table may be computed by dividing number of ring gear teeth by number of pinion gear teeth.
Rear Axle Ratio
Application Ratio
B210........................................... 3.889-1
610 & 710.................................. 3.700-1
620............................................. 4.375-1
 |
| FIG. 1 EXPLODED VIEW OF DATSUN SEPARATE CARRIER DIFFERENTIAL ASSEMBLY |
REMOVAL AND INSTALLATION
Axle Shafts and Bearings
Removal, 610 & 620 - Raise and support vehicle and remove rear wheels. Disconnect parking brake cable by removing adjusting nut and clamps (620) or by removing cross-rod clevis pin (610). Disconnect and plug wheel cylinder inlet line and remove brake drum. Remove four brake assembly retaining nuts and remove axle assembly using a slide hammer.
Disassembly - Place axle in suitable work stand and bend lock washer tabs away from nut. Remove lock nut, then using axle shaft bearing puller, withdraw wheel bearing with cage and brake assembly. If necessary, remove oil seal from inside bearing cage. With a brass drift and hammer top against bearing race surface until race is remove.
Reassembly - Fit bearing race and rubber grease seal to cage by carefully seating with brass hammer. After seal installation, fill lip with grease. Install brake assembly and bearing cage on axle, then fit bearing race using a brass drift. Press in new bearing, then tighten lock nut and bend up lock tabs.
Installation - Apply wheel bearing grease in recess of axle case end. Install axle shaft after first replacing oil seal in axle housing. Ensure seal is not damaged during installation. Adjust axial end play using proper shim pack. To complete installation, reverse removal procedure. NOTE - Adjustment is .012-.035" (.30-.90 mm) on one side (either side) and .001-.006" (.02-.15 mm) on the other (opposite) side.
 |
| FIG. 2 REMOVING LOCK NUT ON 610 AND 620 MODELS |
Removal, B210 and 710 - Raise and support vehicle and remove rear wheels. Disconnect wheel cylinder inlet line and plug opening. Disconnect parking brake linkage. Remove brake drum and four nuts mounting brake backing plate to axle housing. Remove axle assembly from housing using a slide hammer. Remove oil seal and replace at this time.
Inspection - Check following components and replace any found defective. Inspect axle shaft deflection, oil seal tip, and bearing.
Disassembly - Place axle shaft assembly into suitable holding device and chisel off wheel bearing collar; then remove wheel bearing.
 |
| FIG. 3 LOCATION FOR CHECKING CLEARANCE BETWEEN WHEEL BEARING AND AXLE TUBE |
Reassembly - Install bearing spacer, bearing and new bearing collar onto axle shaft. Bearing collar must be installed under 3-5 tons force.
Installation - Fit axle into axle housing being careful not to damage oil seal. Adjust clearance between wheel bearing and axle tube end using .039" (1.0 mm) shim as shown in illustration. Measure axial end play with a dial indicator, reading should be .018" (.45 mm). Reverse removal procedure for remaining components.
PINION FLANGE SEAL
NOTE - The following procedure can only be performed on those models that use non-adjustable spacer (not collapsible spacer type).
Removal - Raise and support rear end of vehicle, then drain gear oil. Index mark propeller shaft and companion flange, then detach shaft and wire out-of-way. Remove drive pinion nut and using suitable puller extract companion flange. With special tool (ST33290001) remove oil seal.
Installation - Set new oil seal into position and pack grease between seal lips. Position companion flange and flat washer on drive pinion, then tighten nut and check bearing preload.
DIFFERENTIAL CARRIER
Removal - Raise and support vehicle on safety stands placed under rear axle housing. Drain gear lubricant. Index mark propeller shaft and remove. Withdraw rear axle shafts as previously described. Remove nuts mounting differential gear carrier to rear axle housing and lift out gear carrier.
Installation - To install differential gear carrier, reverse removal procedure and tighten nuts.
AXLE ASSEMBLY
Removal - Raise and support vehicle safety stands. Place a floor jack under center of axle housing. Remove rear wheels. Index mark propeller shaft and companion flange so components can be realigned in original position. Disconnect bolts mounting propeller shaft and carefully guide shaft from vehicle. Separate parking brake linkage at rear coupling and place forward out-of-way. Disconnect brake line rear union and plug opening. Disconnect shock absorbers at lower mount and compress until clear. Lower jack under axle housing and remove nuts and U-bolts securing leaf springs. With axle housing balanced on floor jack, carefully maneuver from vehicle.
Installation - To install axle housing, reverse removal procedure noting the following. Ensure propeller shaft index marks are properly aligned. Be sure U-bolts are not twisted over axle housing and that vehicle weight is on wheels when lower end of shock absorber is tightened.
OVERHAUL
Disassembly
NOTE - Predisassembly inspection of ring gear backlash and gear tooth contact can indicate where possible problems may be oriented. See Gear Tooth Contact at beginning of this section.
1) With differential carrier mounted in suitable work stand, index mark side bearing caps and carrier. Remove bearing caps and lift out differential assembly. Remove drive pinion lock nut and pull companion flange off using a gear puller. Remove drive pinion together with rear bearing inner race, spacer and washer. Drive pinion can be feed by tapping front end of assembly. If necessary, extract oil seal and withdraw front bearing inner race.
 |
| FIG. 4 MEASURING SIDE BEARING THICKNESS |
2) Use suitable puller (ST30031000) and extract bearing from drive pinion gear. Remove front and rear bearing races using a drift. Disassemble differential gear case as follows: Using suitable puller (ST33051001) remove side bearings. Keep right and left side components separate for reassembly. Bend back ring gear retaining bolt lock tabs and remove bolts by loosening in a diagonal sequence. Drive out pinion shaft lock pin and remove pinion gears, side gears and thrust washers. Identify gears and thrust washers for proper reassembly.
INSPECTION
Thoroughly clean all disassembled parts and visually inspect for excessive wear. Check all gears for wear and replace when necessary. NOTE - Drive pinion and ring gear are replaced only as a set. Inspect thrust washer and surfaces can be sure they are free from surface scratches.
REASSEMBLY
 |
| FIG. 5 CHECKING DRIVE PINION HEIGHT ADJUSTMENT |
Case Assembly - Fit pinion and side gears and thrust washers in differential case. Assemble pinion shaft to differential case so lock pin holes align with shaft. Inserting proper side gear thrust washers, obtain specified clearance between rear face of side gear and thrust washer. Insert pinion shaft lock pin and using a punch, secure into place. Lightly oil gear tooth areas and all thrust, then check that they are free to run smoothly. Fit ring gear on differential case, tighten bolts diagonally, and bend over lock tabs. If side bearing is to be replaced, measure thickness of new ones using suitable tool set as shown in illustration. Normal bearing thickness should be as specified. Using suitable press seat side bearing cone into differential case.
Drive Pinion Height - Pinion height is adjusted with drive pinion adjusting washer placed behind the drive pinion gear. Variation from the standard size to the drive gear center is marked on drive pinion gear head. If tolerance is greater than standard size, number is marked in "+", if less than standard size, marking is "-". Install front and rear drive pinion outer races in gear carrier. Fit drive pinion adjusting washers and rear bearing on suitable dummy shaft. Position dummy shaft in final drive housing without drive pinion adjusting spacer, then put on front pinion bearing and companion flange.
 |
| FIG. 6 MEASURING CLEARANCE BETWEEN HEIGHT GAUGE AND DUMMY SHAFT |
Tighten drive pinion nut to specified preload setting. Ensure not to overtighten drive pinion nut. Fit suitable drive pinion height gauge on final drive housing and measure clearance between end of gauge and surface of dummy shaft as shown in illustration. To calculate thickness of needed drive pinion adjusting washer, use the following formula
T = W + N - (Hx.01) - .2
T = Thickness of needed shim.
W = Thickness of temporary shim.
N = Clearance between depth gauge and dummy shaft.
H = Figure stamped on drive pinion head.
NOTE - Formula values are expressed in millimeters.
Remove dummy shaft from gear carrier, take out pinion rear bearing from dummy shaft, select correct shims based on calculation and refit pinion rear bearing and drive pinion. Ensure face side of shims are toward back of pinion gear.
Drive Pinion Preload, Non-Collapsible Spacer Type - Adjustment of drive pinion preload is accomplished with spacer and washers placed between front and rear inner bearing races. NOTE - Adjustment must be performed without oil seal installed. Proceed with adjustment as follows. Liberally lubricate pinion bearings and install in the following order; drive pinion, spacer, washer, front inner race, companion flange and flat washer. Tighten nut to specified torque. Rotate pinion by hand so pinion nut is not over tightened. Increase spacer and washer thickness when pinion will no longer turn. Using a suitable pinion bearing preload gauge, determine the correct washer and spacer needed to provide specified preload. Spacers and washers are available in various sizes. Insert proper spacer and washer and again check preload. If preload is within specifications, remove drive pinion nut and companion flange, then press in a new oil seal. Install companion flange and tighten nut.
 |
| FIG. 7 CALCULATING SIDE BEARING SHIM THICKNESS |
Drive Pinion Preload, Collapsible Spacer Type - After obtaining final pinion bearing height, lubricate front bearing and place into carrier. Fit new oil seal in carrier and fill space between seal lips with grease. Slip new collapsible spacer on drive pinion, then lubricate pinion rear bearing. Insert companion flange in oil seal while holding flange tightly against pinion front bearing cone. Workign from back of carrier, insert drive pinion into the companion flange. Ensure drive pinion threads and mounting nut are dirt free, then holding companion flange, tighten nut . This step will pull drive pinion into front bearing cone bearing end play will be reduced. With end play still in evidence, companion flange will be felt bottoming on collapsible spacer. Slowly turn nut and continously check end play to ensure bearing preload does not exceed specifications. When end play is eliminated final preload is being approached. Turn pinion in both direction using suitable gauge (ST31275000).
NOTE - Never try to decrease bearing preload by backing off pinion nut; always replace collapsible spacer.
Backlash and Side Bearing Preload - 1) Preload is adjusted with shims. Procedure is done after overhaul work has been completed on differential assembly. When assembling without changing side bearings, install shims of original thickness. If bearings are being replaced, use the following formula to determine the required thickness of adjusting shims:
Left Side: T = (A-C+D-H') x .01 + .2 + E
Right Side T = (B-D + H') x .01 + .2 + f
T = Shim thickness.
B = Figure stamped on right side bearing.
C & D = Figure stamped on differential case (+ or - number).
E & F = Deviation from standard bearing thickness.
H' = Figure stamped on ring gear.
 |
| FIG. 8 MEASURING DISTANCE BETWEEN BEARING CAPS |
NOTE - Formula values are expressed in millimeters.
2) Side bearing thickness is measured using a suitable press (ST325050000) and applying approximately 5.5 lbs. (2.5 kg). Measure thickness in at least three locations.
3) Fit side bearing shim of differential case and press in both side bearing inner races. Place differential case assembly into gear carrier using a rubber mallet. Align index marks on bearing cap and gear carrier, then install bearing cap on carrier.
4) As a second check, measure distance between bearing caps using a micrometer (see illustration). Specification obtained should be as indicated in table. Correct any deviation with the proper shim.
 |
| FIG. 9 MEASURING RING GEAR BACKLASH |
5) Using a suitable dial indicator, measure ring gear-to-drive pinion backlash. Measure ment should be as indicated in specifications. If backlash is less than specified, decrease thickness of left shim and increase right shim by same amount. If backlash is more than specified, reverse placement of shims in procedure above. Using same dial indicator check ring gear deflection, runnout should be as specified.
6) Check side bearing preload by measuring the amount of rotating torque needed to turn companion flange (see illustration). Check gear tooth contact pattern and correct and problem. NOTE - See Gear Tooth Contact Pattern at beginning of this section.
 |
| FIG. 10 MEASURING DRIVE PINION PRELOAD |

Datsun/Nissan 1969-74 Drive Axles Repair Manual
1969-74 DATSUN SEPARATE CARRIER
MODELS COVERED:- B210 (1974)
- 311 (1968-70)
- 510 Station Wagon (1968-72)
- 521 Pickup (1969-72)
- 610 Station Wagon (1973-74)
- 620 Pickup (1972-74)
- 710 (1974)
- 1200 (1971-73)
DESCRIPTION
Differential gear carrier assembly has a hypoid type pinion and ring gear set. The gear carrier is constructed of cast iron. The drive pinion is mounted in two tapered roller bearings that are preloaded by a collapsible spacer or by non-adjustable spacer. Drive pinion is aligned into position with a shim located between shoulder on drive pinion and rear bearing. Differential case is supported in carrier by two tapered roller side bearings. The side bearings are preloaded by inserting shims between bearings and differential. Case housed two side bears that mesh with two pinion gears mounted on a pinion shaft. The pinion shaft is held in case with a lock pin. Pinions and side gears are set in front of thrust washers.
AXLE RATIO AND IDENTIFICATION
Datsun does not identify rear axle with a particular outside identification marking. However all models are some basic type of removable carrier rear axle. It should be noted that part or model numbers may vary between vehicle models, but the internal design is similar. The following table indicates the axle ratios that are available, any not found in table may be computed by dividing number of ring gear teeth by number of pinion gear teeth.
Rear Axle Ratio
Application Ratio
B210
1974............................... 3.900
610
1973................................3.889
620
1972-74.
Man. Trans................4.375
Auto. Trans...............4.625
710
1974
Man. Trans................4.111
Auto. Trans...............3.889
1200
1971-73..........................3.900
REMOVAL AND INSTALLATION
AXLE SHAFT AND BEARINGS
Removal 311, 521 and 620 - Raise vehicle and place an safety stands, remove rear wheels. Disconnect and plug wheel cylinder inlet line, remove brake drum. If drum is hard to pull off, lightly tap outside of casting to free or back off shoe adjuster(s). Remove four brake assembly retaining nuts. Pull out axle shaft and brake assembly using slide hammer.
Inspection - Using a dial indicator, check axle shaft deflection, maximum allowable bending is .039" (1.0 mm). Replace axle shaft or components if any of the following conditions exist seal surface and/or thrust block side end surface scared; bearing rust, rough rolling or chipped; oil seal cracked or otherwisde damaged.
Disassembly - Place axle in suitable work stand and bend lock washer tabs away from nut. Remove lock nut, then using axle shaft bearing puller, withdraw wheel bearing with cage and brake assembly. If necessary, remove oil seal from inside bearing cage. With a brass drift and hammer top against bearing race surface until race is removed.
Reassembly - Fit bearing race and rubber grease seal to cage by carefully seating with brass hammer. After seal installation, fill up with grease. Install brake assembly and bearing cage on axle, then fit bearing race using a brass drift. Press in new bearing then tighten lock nut and bend up lock tabs.


 |
| REMOVING LOCK NUT (620 MODEL SHOWN) |
Removal B210, 510, 610, 710 and 1200 - Raise rear of vehicle and support on safety stands, remove rear wheels. Disconnect wheel cylinder inlet line and plug opening. Disconnect parkign brake linkage and move out-of-way. Remove brake drum and four nuts mounting brake book plate to axle case. Using suitable puller, remove axle shaft assembly. Remove oil seal and replace at this time.
 |
| CLEARANCE BETWEEN WHEEL BEARING AND AXLE TUBE |
Disassembly - Place axle shaft assembly into suitable holding device and chisel off wheel bearing collar; then remove wheel bearing.
Reassembly - Install bearing spacer, bearing and new bearing collar onto axle shaft. Bearing collar must be installed under 3-5 tons foce.
Installation - Fit axle shaft into axle housing being careful not to damage oil seal. Adjust clearance between wheel bearing and axle tube and using .039" (1.0 mm) shim as shown in illustration. Measure axial end play with a dial indicator, reading should be .018" (.45 mm). Reverse removal procedure for remaining components
PINION FLANGE SEAL
NOTE - The following procdure can only be performed on those models that use non-adjustable spacer (not collapsible spacer type).
Removal - Raise and support rear end of vehicle, then drain gear oil. Index mark propeller shaft and companion flange, then detach shaft and wire out-of-way. Remove drive pinion nut and using suitable puller extract companion flange. With special tool (ST33290001) remove oil seal.
Installation - Set new oil seal into position and pack grease between seal lips. Position companion flange and flat washer on drive pinion, then tighten nut and check bearing preload.
DIFFERENTIAL CARRIER
Removal - Raise and support vehicle on safety stands placed under rear axle housing. Drain gear lubricatn. Index mark propeller shaft and remove. Withdraw rear axle shafts as previously described. Remove nuts mounting differential gear carrier to axle housing and lift out gear carrier.
Installation - To install differential gear carrier, reverse removal procedure and tighten nuts.
AXLE ASSEMBLY
Removal - Raise rear of vehicle and place on safety stands. Place a floor jack under center of axle housing. Remove rear wheels. Index mark propeller shaft and companion flange so components can be realigned in original position. Disconnect bolts mounting propeller shaft and carefully guide shaft from vehicle. Separate parking brake linkage at rear coupling and place forward out-of-way. Disconnect brake line rear union and plug opening. Disconnect shock absorbers at lower mount and compress until clear. Lower jack under axle housing and remove nuts and U-bolts securing leaf springs. With axle housing balanced on floor jack, carefully maneuver from vehicle.
Installation - To install axle housing, reverse removal procedure noting the following: Ensure propeller shaft index marks are properly aligned. Be sure U-bolts are not twisted over axle housing and that vehicle weight is on wheels when lower end of shock absorber is tightened.
OVERHAUL
Disassembly
NOTE - Prediassembly inspection of ring gear backlash and gear tooth contact can indicate where possible problems may be oriented. See Gear Tooth Contact at beginning of this section
1) With differential carrier mounted in suitable work stand, index mark side bearing caps and carrier. Remove bearing caps and lift out differential assembly. Remove drive pinion lock nut and pull companion flange off using a gear puller. Remove drive pinion together with rear bearing inner race, spacer and washer. Drive pinion can be freed by tapping front ed of assembly. If necessary, extract oil seal and withdraw front bearing inner race.
2) Using suitable puller (ST300310000) extract pinion. To take out both front and rear bearing outer races, use drift placed on race side surface and tap out. To disassemble differential gear case proceed as follows: Using a suitable puller (ST3305001) remove side bearings. Keep right and left side components separated for reassembly. Lift ring gear bolt lock tabs and remove bolts by loosening in a diagonal sequence. Using a punch, top out pinion gear lock pin and remove pinion gears, side gears and thrust washers. Identify gears and thrust washers for ireinstallation.

Thoroughly clean all disassembled parts and visually inspect for excessive wear. Check all gears for wear and replace when necessary. NOTE - Drive pinion and ring gear are replaced only as a set. Inspect thrust washer surfaces and be sure they are free from surface scratches.
REASSEMBLY
 |
| ADJUSTING PINION HEIGHT |
Drive Pinion Height - Pinion height is adjusted with drive pinion adjusting washer placed behind the drive pinion gear. Variation from the standard size ot the drive gear center is marked on drive pinino gear head. If tolerance is greater than standard size, number is marked in "+", if less than standard size, marking is "-". Install front and rear drive pinion outer races in gear carrier. Fit drive pinion adjusting washers and bearing on suitable dummy shaft. Position dummy shaft in final drive housing without drive pinion adjusting spacer, then pu on front pinion bearing and companion flange. Tighten drive pinion nut to specified preload setting. Fit suitable drive pinion height gauge on final drive housing and measur clearance between end of gauge and surface of dummy shaft as shown in illustration. To calculate thickness of needed drive pinion adjusting washer, use the following formula:
 |
| MEASURING CLEARANCE BETWEEN HEIGHT GAUGE AND DUMMY SHAFT |
T = Thickness of needed shim.
W = Thickness of temporary shim.
N = Clearance between depth gauge and dummy shaft.
H = Figure stamped on drive pinion head.
NOTE - Formula values are expressed in millimeters.
Remove dummy shaft from gear carrier, take out pinion rear bearing from dummy shaft, select correct shims based on calculation and refit pinion rear bearing and drive pinion. Ensure face side of shims are toward back of pinion gear.
Drive Pinion Preload, Non-Collapsible Spacer Type - Adjustment of drive pinion preload is accomplished with spacer and washers placed between front and rear inner bearing races. NOTE - Adjustment must be performed without oil seal installed. Proceed with adjustment as follows:
Liberally lubricate pinion bearings and install in the following order; drive pinion, spacer, washer, front inner race, companion flange and flat washer. Tighten nut to specified torque. Rotate pinion by hand so pinion nut is not over tightened. Increase spacer and washer thickness when pinion will no longer turn. Using a suitable pinion bearing preload gauge, determine the correct washer and spacer needed to provide specified epreload. Spacers and washers are available in various sizes. Insert proper spacer and washer and again check preload. If preload is within specifications, remove drive pinion nut and companion flange, then press in a new oil seal. Install companion flange and tighten nut.
Drive Pinion Preload, Collapsible Spacer Type - After obtaining final pinion bearing height, lubricate front bearing and place into carrier. Fit new oil seal in carrier and fill space between seal lips with grease. Slip new collapsible spacer on drive pinion, then lubricate pinion rear bearing. Insert companion flange in oil seal while holding flange tightly against pinion bearing cone. Working from back of carrier, insert drive pinion into the companion flange. Ensure drive pinion threads and mounting nut are dirt free, then holding companion flange, tighten nut. This step will pull drive pinion front bearing cone and flange. When drive pinion is pulled into bearing cone bearing end play will be reduced. With end play still in evidence, companion flange will be felt bottoming on collapsible spacer. Slowly turn nut and continiously check end play to ensure bearing preload does not exceed specifications. When end play is eliminated final preload is being approached. Turn pinion in both direction to set bearing. Adjust bearing preload to specifications using suitable gauge (ST31275000).
NOTE - Never try to decrease bearing preload by backing off pinion nut; always replace collapsible spacer.
 |
| CALCULATING SIDE BEARING SHIM THICKNESS |
Left Side: T = (A-C + D-H') x .01 + .2 + E
Right Side T = (B-D + H') x .01 + .2 + F
T = Shim thickness.
B = Figure stamped on right side bearing.
C & D = Figure stamped on differential case (+ or 0 number).
E & F = Deviation from standard bearing thickness.
H' = Figure stamped on ring gear.
 |
| MEASURING DISTANCE BETWEEN BEARING CAPS |
2) Side bearing thickness is measured using a suitable press (ST3250S0000) and applying approximately 5.5 lbs. (2.5 kg). Measure thickness in at least three locations.
3) Fit side bearing shim of differential case and press in both side bearing inner races. Place differential case assembly into gear carrier, then install bearing cap on carrier.
4) As a second check, measure distance between bearing caps using a micrometer (see illustration).. Specification obtained should be as indicated in table. Correct any deviation with the proper shim.
 |
| MEASURING RING GEAR BACKLASH |
6) Check side bearing preload by measuring amount of rotating torque needed to turn compoanion flange (see illustration). Check gear tooth contact pattern and correct any problem. NOTE - See Gear Tooth Contact Pattern at beginning of this section.


 |
| MEASURING DRIVE PINION PRELOAD |

Wednesday, March 28, 2012
Datsun 1968-76 Drive Axles Repair Manual
1968-74 DATSUN INTEGRAL HOUSING (I.R.S)
- 510 (1968-72)
- 610 Sedan and Hardtop (1973-74)
- 240Z (1970-73)
- 260Z (1974)
DESCRIPTION
The axle assembly is the hypoid gear type with integral carrier housing. The pinion bearing preload adjustment is made with a spacer and washer between the front and rear bearing cones. The differential side bearing preload and the pinion depth adjustment are made by shims. Driving power is transmitted to the rear axle by ball spline type driveshaft with universal joints at both ends.
AXLE RATIO AND IDENTIFICATION
All Datsun models with Independent Rear Suspension (I.R.S.), use one basic type rear axle assembly. Any differences in Removal and Installation or Overhaul procedures will be noted where they occur. To determine axle ratio, divide number of ring gear teeth by number of pinion teeth.
REMOVAL AND INSTALLATION
Axle Shaft and Bearings
Removal - Raise and support vehicle and remove wheel and brake drum. Disconnect driveshaft from axle outer flange. Remove wheel bearing lock nut while holding axle shaft outer flange stationary. Using suitable axle stand (ST07640000) and slide hammer, remove axle shaft. Remove wheel bearing spacer, companion flange and bearing washer, then remove inner wheel bearing and oil seal. Remove grease catcher, then press or pull outer wheel bearing from axle shaft. NOTE - Do not reuse old outer wheel bearing.
 |
| REAR AXLE ASSEMBLY (MODEL 610 SHOWN) |
Installation - To install, reverse removal procedure and note the following: Clean and inspect all parts for wear or damage and replace as necessary. Grease wheel bearings and housing before installation. When installing bearings ensure outer bearing is installed with seal towards wheel and that inner bearing is installed with seal facing differential. A mark "A", "B" or "C" is stamped on axle housing. Ensure that bearing spacer with same mark is installed. Tighten all bolts and nuts and adjust wheel bearings.
Wheel Bearing Adjustment - After tightening wheel bearing lock nut to specification, check that axle shaft end play is .006" (.15 mm) or less. Check that turning torque of axle shaft is less than 1.8 lbs (.8 kg) at hub bolt. If either adjustment is not to specification, disassemble axle shaft assembly and replace bearing spacer.
DRIVE SHAFTS
Removal and Installation - Raise and support rear of vehicle on safety stands. Disconnect drive shaft from axle shaft companion flange. Remove differential side yoke attaching bolt and lift out side yoke and drive shaft as an assembly. To install, reverse removal procedure and note the following: Exercese care when installing assembly to prevent damage to side yoke and oil seal. Tighten all bolts to specifications.
PINION FLANGE AND OIL SEAL
Removal - Drain gear oil from differential, then raise and support rear of vehicle. Disconnect propeller shaft from pinion flange, then if necessary remove muffler and disconnect parking brake cable. On 240Z and 260Z models remove rear stabilizer from vehicle. On all models, remove pinion nut, while holding pinion flange stationary. Using a suitable puller remove pinion flange. Remove oil seal using suitable puller (ST33290001).
Installation - To install, reverse remove procedure and note the following: Apply suitable grease between seal lips before installation. Tighten pinion nut to specifications and ensure pinion bearing preload is correctly adjusted. Fill differential to proper level gear oil.
AXLE ASSEMBLY
Removal - Raise and support rear of vehicle. On all models except 240Z and 260Z disconnect parking brake cable from turnbuckle. On 240Z and 260Z models, remove main muffler. On all models, disconnect propeller shaft from axle assembly. On 240Z and 260Z models, loosen front side transverse link inner bolts. On all models, remove axle drive shafts. Support axle assembly on a jack, then remove nuts on both ends of axle assembly rear mounting member. Remove axle assembly front mount attaching bolts, lower assembly on jack and remove from vehicle. NOTE -On all models except 240Z and 260Z, support suspension member tor prevent damage to insulators.
Installation - To install, reverse removal procedure and note the following: Install same size mounting spacer between axle assembly and front mount. Tighten all nuts and bolts to specifications and fill assembly to correct level with gear oil.
DRIVE SHAFT OVERHAUL
DISASSEMBLY
 |
| DRIVE SHAFT ASSEMBLY |
NOTE - Drive shaft should be disassembled only to lubricate ball spline.
Remove universal joint from differential end of drive shaft. Remove snap ring from sleeve yoke plug and remove plug. Compress drive shaft and remove snap ring from stopper, then remove stopper. Disconnect boot and separate drive shaft carefully as not to loose balls and spacers.
DRIVE SHAFT ASSEMBLY
INSPECTION
Check rubber boot and oil seeds for damage and replace as necessary. Inspect drive shaft for straightness, crack, damage and distortion and replace drive shaft if necessary. Check all other drive shaft assembly if any faulty part is found. Check drive shaft play as shown in illustration and replace complete assembly if play exceeds .004" (1 mm). NOTE - Measurement should be taken with drive shaft fully compressed.
REASSEMBLY
To reassemble, reverse disassembly procedure and note the follwing: Align yokes and ensure steel balls and spacers are installed in correct order. Adjust axial play of universal joint to within .0008" (.02 mm) by selecting proper size snap ring. NOTE - Snap rings are available in four sizes: .0587" (1.49 mm); .0598" (1.52 mm); ..0610" (1.55 mm); .0622" (1.58 mm). Apply grease to ball grooves and oil grooves.
AXLE ASSEMBLY AND OVERHAUL
1) Mount axle assembly on suitable holding fixture. Remove rear mounting member and axle assembly cover plate. Using suitable puller, remove side reatainers and shims (610), or side flange, bearing cap screws, caps and shims (280Z) NOTE - Mark retainers or bearing caps and shims for reassembly. Left and right sides are not interchangeable. If side bearings on the 610 model are to be replaced, remove bearing outer race from side retainer using a suitable puller.
2) Hold pinion flange stationary and remove pinion nut, then using suitable puller, remove pinion flange. Press drive pinion from carrier and remove rear bearing inner race, bearing spacer and adjusting washers. Remove oil seal. Remove pilot bearing together with pilot bearing spacer and front bearing inner race. Press rear bearing inner race from drive pinion. Using a drift, remove front and rear bearing outer races.
3) To disassemble differential case, use suitable puller and remove side bearings. NOTE - Keep left and right side bearings separate, they are not interchangeable. Remove ring gear by unfolding lock strap and loosening bolts. Punch off pinion shaft lock pin from ring gear side, then remove pinion shaft, pinion gears, side gears and thrust washers. NOTE - Mark gears and thrust washers for instaallation in their original position. Thoroughly clean and inspect all parts for wear or damage and repair or replace as necessary.
Differential Case Assembly - 1) Assemble pinion gears, side gears and thrust washers in original position in differential case. Fit pinion shaft to differential case so that it aligns with lock pin holes. Adjust side gear-to-pinion gear backlash or adjust clearance between rear face of side gear and thrust washer. Install pinion shaft lock pin and lock in place with punch.
2) Apply gear oil to gear tooth surface and thrust surfaces and ensure gears rotate smoothly. Install ring gears on differential case and install bolts and new lock washers. NOTE -Tighten ring gear bolts diagonally while tapping around bolt heads with a hammer.
REASSEMBLY
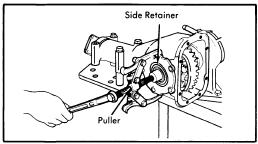 |
| FIG. 4 REMOVING SIDE RETAINER (610 MODEL) |
AXLE ASSEMBLY AND OVERHAUL
1) Mount axle assembly on suitable holding fixture. Remove rear mounting member and axle assembly cover plate. Using suitable puller, remove side reatainers and shims (610), or side flange, bearing cap screws, caps and shims (280Z) NOTE - Mark retainers or bearing caps and shims for reassembly. Left and right sides are not interchangeable. If side bearings on the 610 model are to be replaced, remove bearing outer race from side retainer using a suitable puller.
 |
| FIG. 5 REMOVING PINION GEAR BEARING INNER RACE |
3) To disassemble differential case, use suitable puller and remove side bearings. NOTE - Keep left and right side bearings separate, they are not interchangeable. Remove ring gear by unfolding lock strap and loosening bolts. Punch off pinion shaft lock pin from ring gear side, then remove pinion shaft, pinion gears, side gears and thrust washers. NOTE - Mark gears and thrust washers for instaallation in their original position. Thoroughly clean and inspect all parts for wear or damage and repair or replace as necessary.
REASSEMBLY AND ADJUSTMENT
 |
| FIG. 7 MEASURING SIDE BEARING WIDTH |
 |
| FIG. 6 MEASURING SIDE GEAR CLEARANCE |
2) Apply gear oil to gear tooth surface and thrust surfaces and ensure gears rotate smoothly. Install ring gears on differential case and install bolts and new lock washers. NOTE -Tighten ring gear bolts diagonally while tapping around bolt heads with a hammer.
 |
| MEASURING DRIVE SHAFT PLAY |
3) When replacing side bearings, measure bearing width with a .787" (20 mm) gauge and 5.5 lb (2.5 kg) weight block. Bearing width should be slightly smaller than gauge. Press fit side bearing inner race on differential case and side bearing outer race into side retainers. Install new oil seal on side retainer and apply grease to cavity between seal lips.
Drive Pinion Preload - 1) NOTE - Perform adjustment without pinion shaft oil seal installed. Press fit and rear bearing outer races into gear carrier. Insert suitable dummy shaft spacer (ST31851000), pinion height adjusting spacer and rear bearing inner race into suitable dummy shaft (ST31212000).
2) Fit drive pinion bearing spacer, washer, front bearing inner race, suitable dummy shaft collar (ST31214000) and pinion flange on dummy shaft and tighten drive pinion nut to specified torque.
 |
| ADJUSTING DRIVE PINION PRELOAD |
3) Measure pinion bearing preload using suitable preload gauge (ST31275000) and select washer and spacer that will provide specified preload. NOTE - Preload of old bearing is the same as that of a new bearing. Pinion bearing adjusting washers are available in thicknesses of .0906-.1024" (2.3-2.6 mm). Pinion bearing adjusting spacers are available in lengths at 2.2126-2.22520" (56.2-57.2 mm) on 610 models and 2.0551-2.0945" (52.2-53.2 mm) on all other models.
DRIVE PINION HEIGHT - 1) Install suitable height gauge (ST3121000) on gear carrier with dummy shaft mounted. Measure clearance between tip end of height gauge and end surface of dummy shaft. Thickness of drive pinion height adjusting washer can be obtained by the following formula.
 |
| MEASURING DRIVE PINION HEIGHT |
T=W + N - (H - D' - S) x.01 - .2
NOTE - Formula values are give in Millimeters
T = Thickness of adjusting washer needed.
W = Thickness of washer temporarily installed.
N = Clearance between gauge and dummy shaft.
D' = Figure marked on dummy shaft
S = Figure marked on height gauge
NOTE - If values signifying H, D, and S are not given, regard them as zero.
2) Fit correct pinion adjusting washer in drive pinion and press fit rear bearing inner race. Lubricate pinion front and rear bearings, then install drive pinion in carrier along with drive pinion bearing spacer and washer, front bearing race, front bearing pilot spacer, pilot bearing and oil seal. Install pinion flange and tighten pinion nut to specifications
Side Bearing Preload - 1) Required thickness of left and right side retainer shims can be obtained by the following formulas
 |
| SIDE BEARING PRELOAD FORMULA VALUES |
T1 = (A + C + G1 - D) X .01 + .76 - E
T2 = (B + D+ G2) X .01 + .76 - F
NOTE - Formula values are given in millimeters
T1 = Required thickness of left side retainer shim.
T2 = Required thickness of right side retainer shim.
A & B = Figure marked on gear carrier.
C & D = Figure marked on differential case.
E & F = Difference in width of left or right bearing.
G1 and G2 = Figure marked on left or right retainers.
NOTE - If values signifying A,B,C,D,G1 and G2 are not given, regard them as zero.
2) Install differential case assembly in gear carrier in reverse order of disassembly. Fit correct shims and "O" ring seal in both side retainers and install retainers in carrier with arrow pointing as shown in illustration.
 |
| SIDE BEARING PRELOAD IDENTIFICATION MARKS |
 |
| INSTALLING SIDE RETAINER |
3) Using dial indicator, remove ring gear-to-drive pinion backlash and adjust if necessary. Check side bearing preload, and adjust if necessary by adding or removing side retainer shims. NOTE - If side bearing preload is readjusted, ring gear-to-drive pinion backlash must be checked and adjusted. If necessary
Final Inspection and Assembly - After all adjustments are to specifications, make tooth contact pattern test and make any necessary correction. See Gear Tooth Contact Pattern of beginning of this section. Install rear cover and tighten nuts to specifications. Refill axle assembly to correct level with gear oil.
 |
| MEASURING RING GEAR BACKLASH |

Tuesday, November 29, 2011
1974-75 Nissan Datsun Wheel Alignment Guide
DATSUN SPECIFICATIONS AND ADJUSTMENTS
TIRE INFLATION (COLD)
Before attempting to check or adjust wheel alignment, make sure that tires are properly inflated. Refer to manufacturer's specifications given in owner's manual.
RIDING HEIGHT
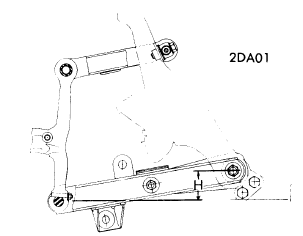
Pickup Only - Measure distance from center of lower control arm bushing (where it connects to body) and lower steering knuckle bushing (see illustration). To adjust, raise vehicle to release tension on anchor bolt adjusting nut and turn anchor bolt to adjust to specified height.
Riding Height Specifications
Application Inches (mm)
620 Pickup................................ 3.1-3.2 (72-82)
CASTER
All Models Exc. Pickup - Preset at factory and cannot be adjusted. If not to specifications, check suspension for wear or damage and repair or replace components as necessary.
Pickup - Caste is adjusted by increasing or decreasing thickness of shims inserted between upper link spindle and upper link mounting bracket. When front shim thickness increases, caster decreases. NOTE - Do not adjust caster with difference between front and rear shim thicknesses beyond .078" (2mm).
CAMBER
All Models (Exc. Pickup) - Preset at factory and cannot be adjusted. If not to specifications, check suspension for wear or damage and repair or replace components as necessary.
Pickup - Camber is adjusted bye increasing or decreasing the thickness of shims inserted between upper link spindle and upper link mounting bracket. When thickness of shims increase, camber decreases.
TOE-IN
All Models - Adjust by loosening each side steering link lock nut and adjusting steering link to change toe-in.
NOTE - Left and right side steering links should be adjusted equally. Tighten lock nuts.
1974 Datsun Models

1975 Nissan Datsun

Subscribe to:
Posts (Atom)